What You Need:
What is an FAQ and why is it so great?
FAQs are pages that contain a list of Frequently Asked Questions. They’re often used as a self-service option to keep you from expending valuable resources answering the same questions over and over. Instead, customers and visitors can easily answer their own questions by visiting the FAQ page! Then you can divert your extra energy to more important pursuits, like tackling your website summer cleaning checklist!
We’ll be going over how to create a fully functional FAQ page in WordPress, a popular site builder.
How to Create Your Own FAQ in WordPress
There are various steps to creating a FAQ, though none of them will take much time or effort. We’ll outline these steps below.
Step 1: Collect a list of frequently asked questions
Before starting the process, collect a list of commonly asked questions. It’s important to make sure that these are actually questions your customers are asking. It can be tempting to create a list of questions that you want the customer to know, but often this can cause the FAQ document to become excessively long and not as useful to the customer.
Once you have a list of frequently asked questions, you can start the next step.
Step 2: Create a WordPress Page
FAQs are something that your customers will need to refer to again and again, so it’s a good idea to make the FAQ a page, rather than post.
To create a WordPress page, follow these steps:
- Log in to your WordPress admin interface
- In the left sidebar, hover over the Pages tab
- In the drop-down, click Add New
This will create a new page and open the page editor for you.
Step 3: Add Your Questions
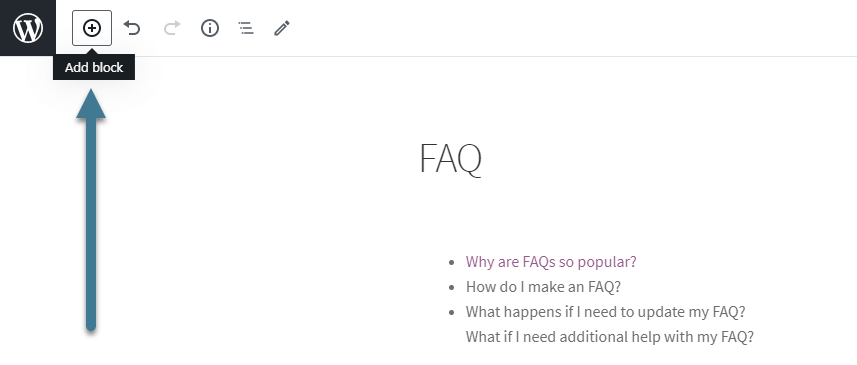
Once the page is created, you can add your questions. If you’re using the newest version of WordPress, you’ll be using the Gutenberg editor to build your page. This editor utilizes building blocks, often referred to as just “blocks,” that you can select and move to create your page.
FAQs are pretty simple in terms of the blocks they use. Since all you need to do is list a question and answer, the header and paragraph blocks are perfect for entering your text.
Keep in mind that it’s a good idea to differentiate your questions from your answer because it makes the FAQ easier to read. Plus, it’s a common practice, so customers will be able to recognize the pattern quickly. You can differentiate the question using formatting methods like bolding the question or using a heading block.

Add blocks to your page by clicking the plus button in the top navigation bar of your page editor, then selecting your desired block.
(Optional) Step 4: Add Anchors
Imagine this: you’re on an FAQ page searching for the answer to a specific question. The FAQ page has a list of all the questions it covers at the beginning. Each question in the list is linked and if you click it, you will immediately be taken to the location of the question and answer.
These internal links are “anchors” and we’ll be showing you how to add them to your very own FAQ in this section. This step is entirely optional, but adding anchors can make your FAQ easier for readers to use.
Anchors do require a bit of HTML to work, but the process is very simple and will make your FAQ much more user friendly. We’ll walk you through every step below, so you don’t need to be familiar with HTML at all to utilize anchors.
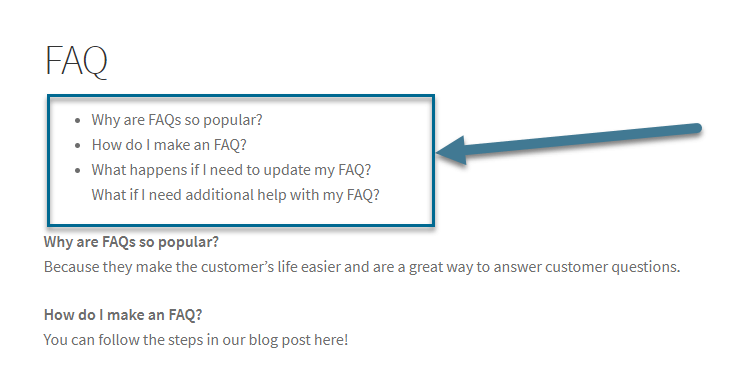
Create a Question List at the Top of the Page
The first step to using anchors is to create a list at the top of the page of all your questions (or at least the question sections, if you have too many questions). This list will be the first thing people interact with and will expedite their process through the FAQ.
Once the list is created, we’re going to switch to creating the actual anchors. Don’t worry – we’ll come back to the list later and link each question to its individual anchor. But we need to set up the anchors first.
Create the Anchors
Now it’s time to create the anchor itself. All you need to go is locate the first question you want to link, click on it’s block, and bring up it’s editing bar. Once the editing bar is up, click the three dots icon at the end. This will bring up a drop-down of more options. In those options, click Edit as HTML.
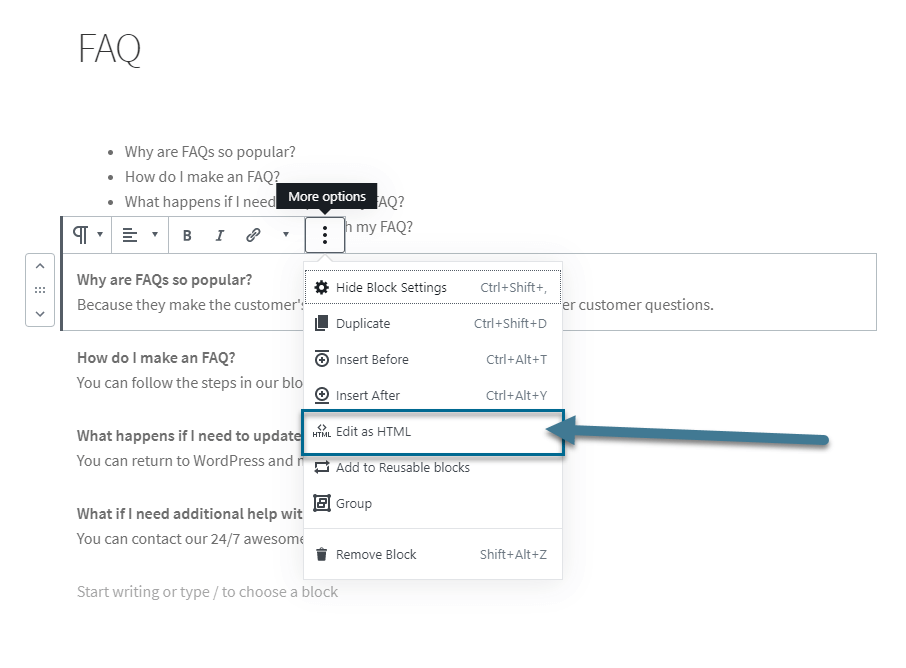
This will transform your block into HTML. While this may seem scary to those unfamiliar with HTML, don’t fret! The next steps are super simple.
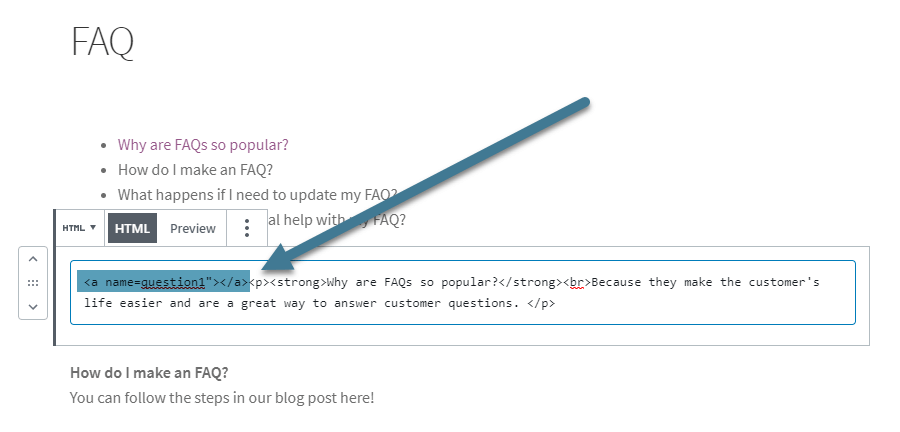
Now, at the very beginning of the HTML block text, enter the following line:
<a name="question_name"></a>
Ta-da! You’ve created your first anchor! This particular anchor is named, “question_name” but feel free to rename it anything you like. Just don’t use any spaces (since they’ll mess up your link).
To change the anchor name, just change the text in your anchor’s quotation marks. For example, if I want to name the anchor question1, the text to enter would be:
<a name="question1"></a>
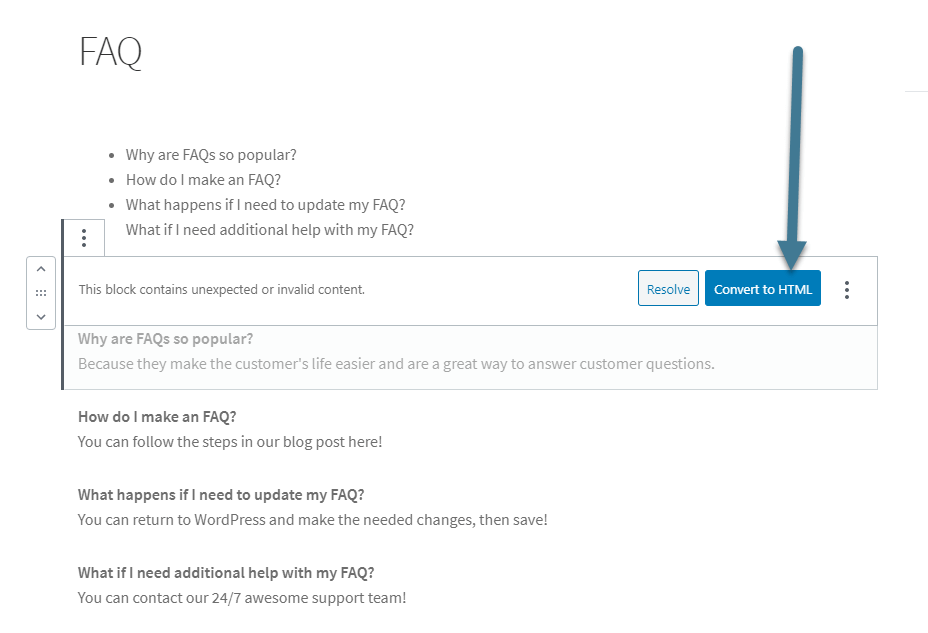
When finished, click outside of the block. Note that the block may ask you to convert to HTML. If so, click the Convert to HTML button. Otherwise, the anchor may not work as intended.
Link back to Your Anchor
Once the anchor has been created, you can link the anchor. If you created a list of questions at the top of your page, it’s time to return there.
To link the anchor, open the list block and highlight the desired question text. Then, in the editor bar, click the link symbol.
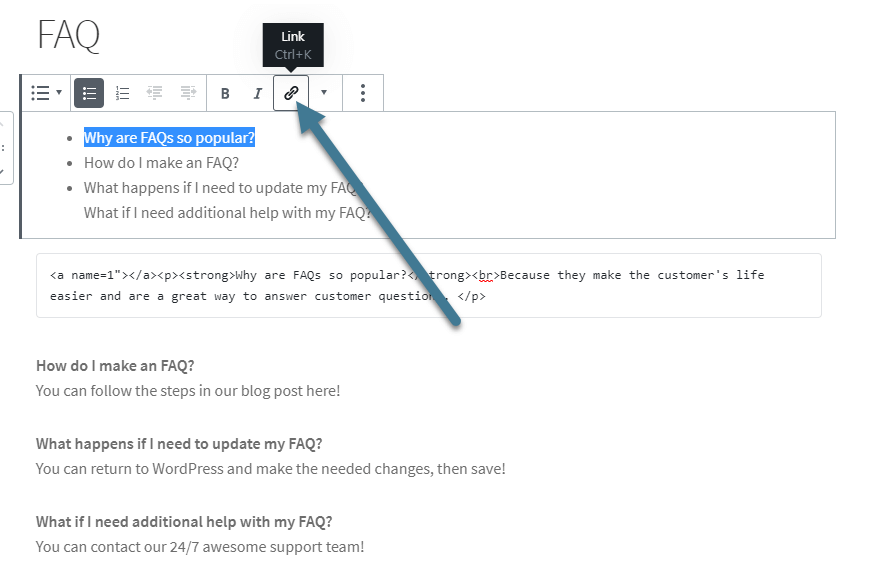
This will open a field where you can enter the anchor text. Anchors don’t work exactly like regular links, since they’re internal. So instead of putting in a full URL, all you need to do is type the “#” sign followed by the anchor name, like this:
#question1
Hit enter to add the link.
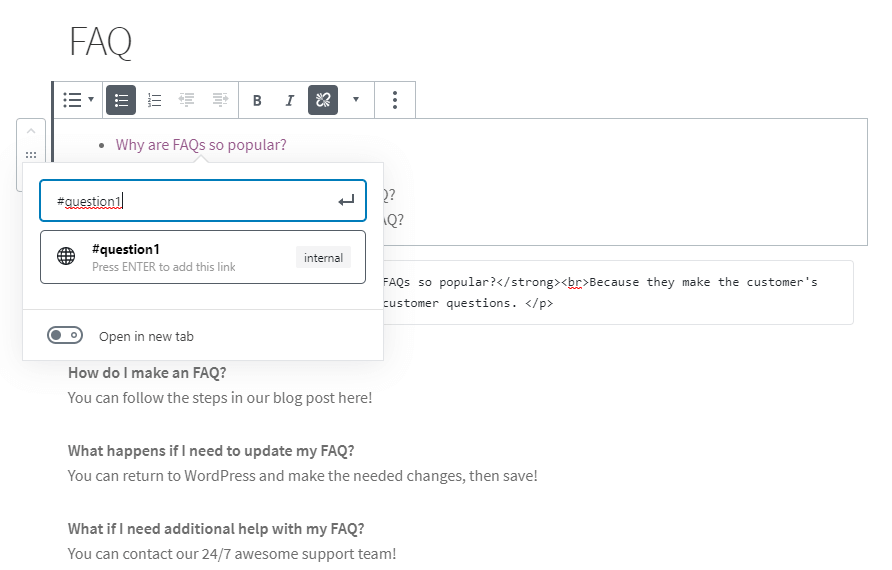
If done correctly, the link should now transport you directly to the anchor point. Internally linking like this works in WordPress’ preview mode, so you can preview the page to test it out!
If you create an anchor point and link for each question asked, your readers will have an easy time finding the answers they need.
Best Practices for FAQs
And that’s all there is on the technical side to building an FAQ in WordPress. However, if you want to make your FAQ stand out, you can try to implement some of these best practices.
Organization is key!
Organization is key when putting together an FAQ. While FAQs are a list of questions, it’s better if you take the time to go through and organize your questions and answers. There should be a clear way for customers to proceed through the document. Even if you choose not to use anchors, you should make sure that your customers know where to go for their question. For example, if you have multiple products covered in a single FAQ, you may want to group questions about the same product type together.
Information should flow logically
In the same vein as the last tip, logically organizing your information is key to creating a successful FAQ. For example, you should answer questions in order from most asked to least asked. That way the majority of customers get what they need without having to wade through an entire page.
Likewise, you should try to keep simpler questions first, especially if they build on each other. For example, we would want a question like, “What is Pair?” to come before a question like, “Why is Pair the best web host ever?” Customers won’t fully appreciate the significance of the second question if they don’t know the answer to the first.
Dealing with Complex Information
When dealing with complex information in an FAQ, don’t be afraid to link to a place that gives more in-depth information. This way, if someone visits the FAQ in hopes of finding an answer, the page will direct them to a place where they can find it. If you choose not to include it, someone might scour the FAQ, not find what they’re looking for, and give up.
Use Customer Language
Make sure your FAQ is written in terms the customer will understand. Afterall, the FAQ is to help customers with questions and often those very new to your offering. Making sure the FAQ is approachable and understandable is key. Try to weed out internal terms and not widely accepted technical terms. While this may feel like dumbing down the answer, it can be the difference between alienating newbies or creating lifelong customers.
Screenshots are your friend
It never hurts to include a screenshot when words aren’t quite doing the job. It’s a great way to orient your readers and break up the wall of text. It’s a win-win!
Keep it simple
And last but not least, try to keep the FAQ simple. An FAQ is just an informational document in a question and answer format. You don’t want to overcomplicate it with long-drawn out explanations or two hundred questions. Keep the document simple and approachable so that it doesn’t scare off your readers.
Some good ways to keep things user-friendly is to make sure you’ve only included the most frequently asked questions. If the question is more niche, an FAQ is not the place for it.
Keeping Up With Your FAQ
And that’s it! That’s all you need to create a successful FAQ on WordPress. It’s important to keep in mind that once you create an FAQ, you should check back in periodically to make sure the information in the FAQ is still up-to-date. You can also add or remove questions as your website grows and changes.
Need help? We’re here to guide you through your WordPress journey, so if you ever need any help, reach out to our 24/7 support team. We even have a Fully Managed WordPress Support team certified to take care of your WordPress hosting needs.