What You’ll Need:
- A Pair WordPress Hosting Account
- The Free Popup Maker Plugin (Learn How to Install Popups Here)
- Optional: Pair Site Staging Enabled to Test Site Changes (Learn How Here)
Procedure Overview:
We’ll use Popup Maker, a free, easy-to-use WordPress plugin, to add a banner without needing to code. We’ll simply edit the text, choose a few settings, and deploy the new banner.
Why a Banner?
A banner is less intrusive than an overlay popup or a slide-in style popup. It can be used to display time-sensitive information like:
- Sales or promotions
- Important site changes
- Direct people to specific sections of your site
- Announce job openings
- Special policies, such as any changes your company is making for Coronavirus
Why Use a Popup Plugin?
The most basic banner is just a block of contrasting colors with some basic text and/or a link. It’d be possible to hardcode this onto the top of your pages, but we think a popup plugin makes things a lot easier, while also offering a few neat options to control how and where to display your information — all without having to code anything.
A popup plugin lets you choose which pages to display your banner on so that you don’t have to do extra work coding the banner onto each relevant page. Plus, you can control whether people see the banner more than once, or whether to stop showing the banner after they’ve viewed it, depending on how urgent the information is. Finally, if anything changes, or if you need to take the banner down, it’s easy to make global changes all at once from one simple interface, rather than having to dig through your site.
I’m Convinced — How Do We Start?
First you’ll need to install Popup Maker. There are many options for popup plugins, so feel free to find a solution that works exactly how you need it to, but for the sake of this tutorial, we’ll focus on Popup Maker, which is free and well-rated at the time of this writing. Feel free to skip ahead if you already know how to install plugins.
We’re just going to briefly highlight the steps to install the plugin, so if you need in-depth instructions on installing plugins, we have you covered here: https://www.pair.com/support/kb/wordpress-installing-plugins/
- Select Plugins from your site’s WordPress menu
- At the top of the Plugins page, click on Add New
- Enter “Popup Maker” in the search bar
- Click on Install Now, and then Activate
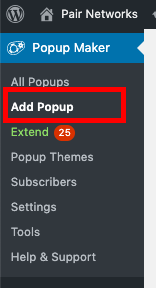
Once Popup Maker is installed and activated, you should see a new link called Popup Maker on your site’s WordPress sidebar menu. Click on that to get started!
Adding a Banner
Click on the Popup Maker link in WordPress’s sidebar. Select “Add New Popup” to begin.
Pick a name for your popup. This internal name will let you remember which popup it is, if you have multiple.
The Popup Title will display on the popup itself, and is optional. You can choose something that gets visitors’ attention like, “Updates to Our Store Hours”.
The visual text editor below the Popup Title box lets you edit the content of the popup itself and lets you add links to other pages on your site.
Adjusting the Banner’s Behavior
If you’ve filled in the information discussed above, you’ve created a basic popup, but not something that specifically behaves like a banner — a popup that resides at the top of the screen. To do that, we’ll need to pick a few appropriate options in the Popup Settings boxes.
Triggers and Cookies
Your banner won’t show without a trigger telling it when to show, so you’ll need to select Add New Trigger. We want the banner to open while visitors are on the page, not when they try to leave or when they click on something — those behaviors would create different kinds of alerts not consistent with a typical banner. You’ll need to select Time Delay/Auto Open. You’ll then select a delay, which can be 0 ms if you want the banner to appear as soon as the page loads.
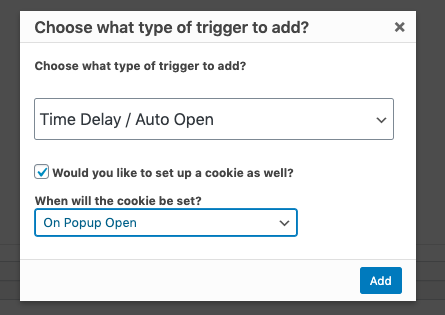
Cookies get a bad reputation sometimes, but in this context a cookie is simply a file that a visitor’s computer will store to let your site know that they’ve seen your banner. Why? If your site knows that a visitor has already seen your banner, you can choose whether to hide the banner in the future in order to be less intrusive.
If a cookie is appropriate for your situation and operating region, you may add a new cookie in the Triggers box right now, or later on. If you do, the banner will only be shown to visitors who DON’T have your cookie stored already. This can help prevent repeatedly displaying the same banner, if you so choose.
Display
Next we’ll set a few options in the Display tab so that our popup behaves like a banner.
Select the Top Bar preset.

You may continue to edit the banner’s appearance in the other tabs, but for a basic banner, the Top Bar preset should be sufficient.
Publishing
If you’re all set, it’s time to hit Publish.
Your popup will appear on your live site after a few minutes. Your caching settings might prevent the banner, or any changes you make to the banner, from appearing on your live site for a few minutes.
Remember: If you view your banner and have a cookie set, the banner won’t show again for you right away. You’ll want to use a private or incognito window on your browser to keep seeing the banner.