You can take advantage of this fast-growing medium by learning how to start a podcast of your own with WordPress. Reaching this large audience of podcast listeners will not only expand your influence, but will also establish you as a thought leader and an authority in your area of focus. Whether your goals involve fame, fortune, or something less cliché, we can help you launch your first podcast with WordPress.
Podcast Basics
Before you start recording, you need a plan to guide you as you make key decisions about your podcast. First, define the goal of your podcast. Do you want your podcast to drive conversions, engagement, or grow website traffic? Defining your goals will also help you narrow down your target audience.
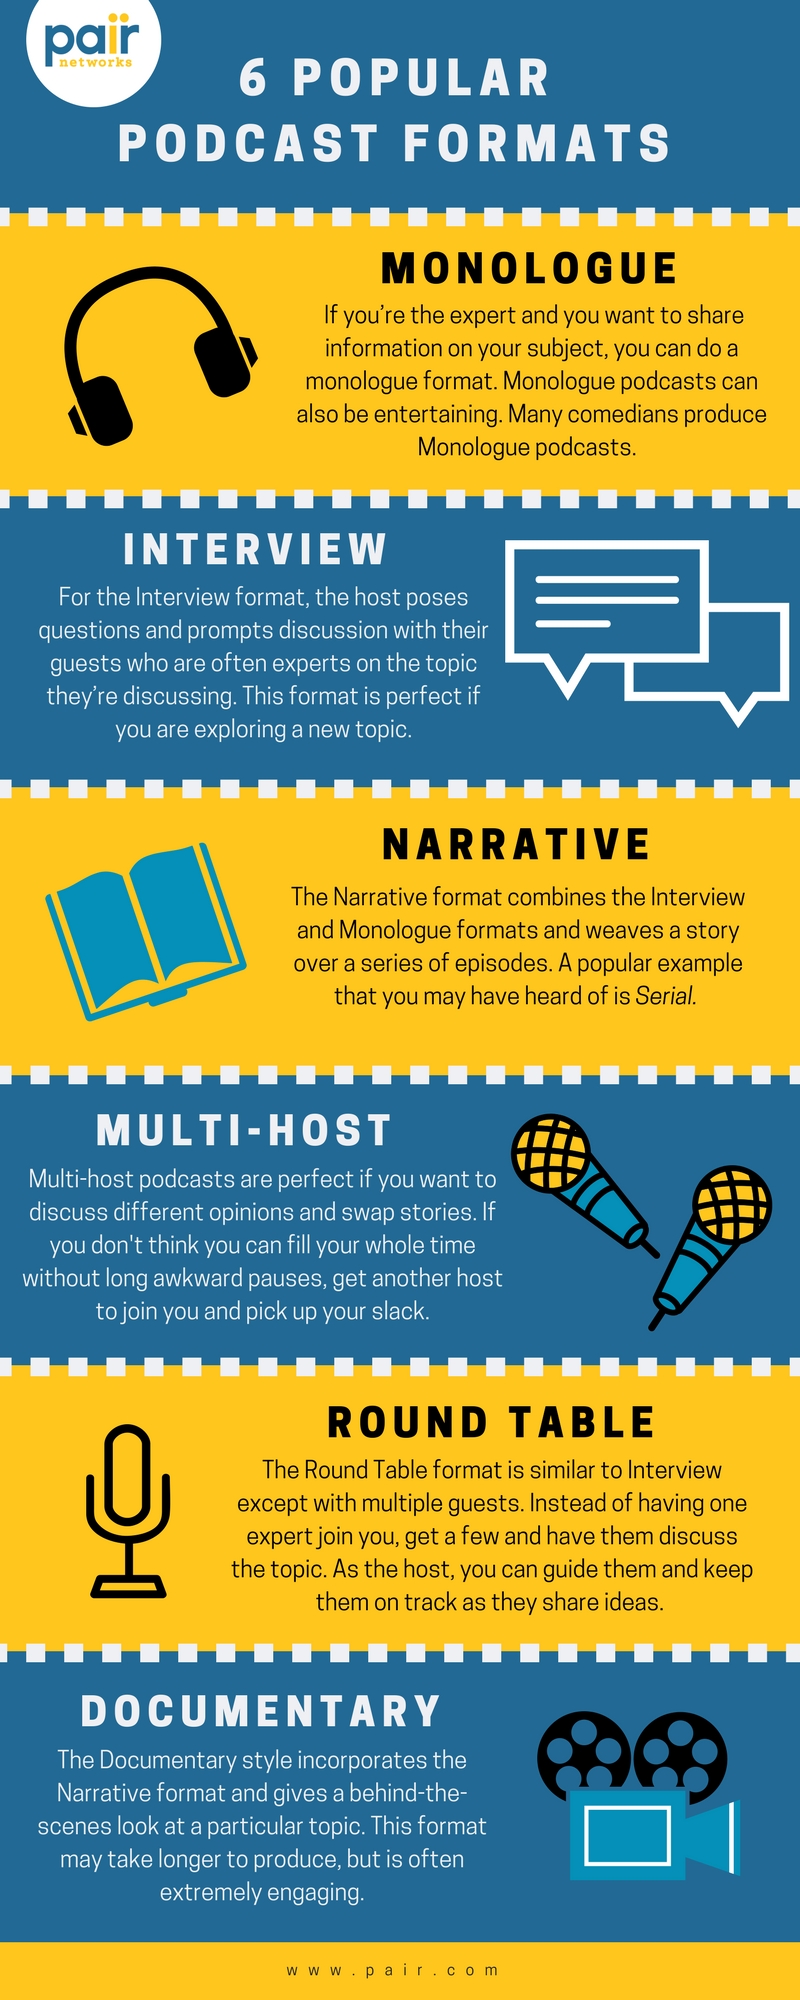
After you outline your goals for your podcast, consider what topics you want to cover and what format you’ll use to share them with your audience. Outline all of your topics for the next few weeks or months. The format you choose you should complement the topics you’re focusing on for your podcast. Check out our podcast infographic for a few different podcast formats to consider:
Once you decide on a format, you should determine the length of your episodes and their frequency. Will you do a 15-minute episode every week or one hour-long episode every month? You should take time restrictions into consideration before you decide. It may take longer than you think to go from record to publish with your podcast.
Next, decide what you’ll name your podcast. The name should reflect your area of focus and be interesting to your audience. As you brainstorm, consider how people will search for your podcast and how you say it aloud. You want it to be easy to remember and clear. If people are confused by your podcast name and don’t understand what it’s about, you may attract the wrong audience and lose their interest quickly. So, keep it simple!
Build Your Website
You’ll need to share your podcast with your audience on a customized website. WordPress is a great site builder for podcasters because it offers a variety of plugins, such as Libsyn, to make production easier for you. The Libsyn plugin allows you to post your episodes to Libsyn directly from WordPress. You’ll need a tool like Libsyn to host your podcast because the audio files require more resources than static web content.
In addition to a site builder, make sure you have a reliable web host capable of handling your website traffic and resource-intensive content. Web hosts often offer first-time customers product discounts or free trials so you can try before you buy. You can also find web hosting plans designed specifically for hosting WordPress sites and customized for podcast hosting. You should also claim your domain name as soon as you can. Domain name availability may also be a factor as you brainstorm names for your podcast. You don’t want to come up with the perfect podcast name and start developing a brand around it only to find out that the domain name is taken.
Recording and Equipment
Your podcast will suffer if the sound quality is terrible. Your first instinct may be to cut costs by using your computer’s microphone to record. While this may seem like a great cost-saving idea, sound quality is one area where you don’t want to skimp. Your listeners will notice if your podcast doesn’t sound good and they won’t bother to listen very long. If you want a high-quality sound, here are some key pieces of equipment you’ll need:
- Microphone (preferably not your computer mic)
- Recording software (such as Audacity)
- Call recording tool for interviewing people over the phone or via skype
- Audio editing software (Audacity lets you record and edit)
- Headphones
You don’t need to break the bank as you shop for equipment. Just do some research and make sure you find quality, affordable tools to fit your budget. Another way to improve sound quality is to make sure your recording space is quiet. Don’t play music in the background or record in a noisy spot. You can add sound effects and music later as you edit.
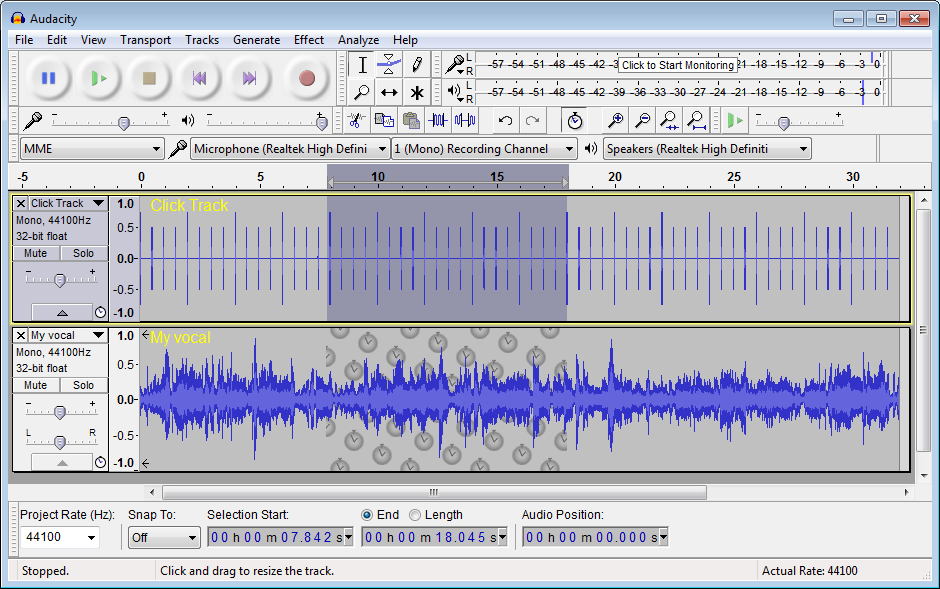
Use recording software such as Audacity to record your episode and edit the audio. Audacity is popular because it’s free and easy to use. After downloading Audacity, create a new project and hit the Record button. You can cut awkward pauses or coughs later during the editing stage. When you finish recording and editing your project, export your new audio file as an MP3 and name it appropriately to avoid confusion later.
Before each episode, prepare some discussion points, outline your narrative, or write down some compelling questions for your guest. You want your content to be consistent and engaging so it’s best if you go in with an idea of where you want to take your listeners in each episode.
Publishing on WordPress
Once your first episode is polished and ready to go, you can upload it to your WordPress site. First, login to your admin dashboard. Then, install the podcast plugin you’ve decided to use to host your audio files. (Learn how to install WordPress plugins here.) Before you can publish your first episode on WordPress, you need to upload the audio file to your newly installed plugin. Many podcasters also use a podcast player plugin such as Smart Podcast Player, so listeners can tune into your first episode directly from your site.
Once your podcast plugins are installed and set up properly, you can publish your podcast with WordPress. Go to Posts and then click Add New Page. You may want to add a new category for your podcast episodes so they’re easier to find. Scroll down to the bottom of the editing page to find the “Podcast Episode” box. You can add your episode here either by uploading the file directly or pasting the file’s URL. Go through all of the settings of your podcast player to make sure it will appear the way you want your audience to see it. Then, add a catchy title and you’re ready to publish!
Get More Subscribers
While your podcast is available and ready for public consumption, your audience may not know it exists yet. You can preview your episodes and increase awareness for your podcast by submitting it to iTunes. To preview it, launch iTunes and subscribe by going to File and selecting Subscribe to Podcast then paste your URL (ex: https://wwww.yourpairdomain.com/feed/podcast). iTunes will display the podcast you’ve selected so you can see how it’ll look to your listeners. Review the image, title, subtitle, and description for any errors before submitting your podcast.
In order to submit your podcast to iTunes, download the latest version of the tool on your computer and launch the application. Next, go to the iTunes store, the Podcasts menu, and then the Podcast Quick Links section where you will find a link to submit a new podcast.
After submitting your podcast, it’s time to promote it! You can post on social media and let your audience know every time you publish a new episode. Include a link to your podcast WordPress site in your monthly newsletters or on your main website home page. As you grow subscribers, listen to their feedback. Are they leaving comments for you on your WordPress page? You can use this feedback to drive new content and tackle different subjects on your first podcast!

