 How to Serve Your Site Over HTTPS
A site served over https is more secure. Since https uses the secure port 443, which encrypts outgoing information, it is much more difficult for people to spy on your site’s information. Regular http, on the other hand, uses port 80, which sends information via plain text. Plain text can easily be compromised during transit and by using it, you risk exposing your site and its visitors’ information to the world. However, in order to use https, you will first need an SSL certificate. For more information about SSL certificates, see our What is an SSL Certificate blog.
Making the Switch
The process of switching between http and https can vary based on your site type. For example, since CMSs are built for ease of customer use, they may have different steps for directing traffic from http to https. In this blog, we will explain how to serve a traditional non-CMS site and a WordPress site over https. If you use another CMS, please see its documentation for information about how to serve your site over a secure connection.
Traditional Site
A traditional site is made up of HTML, CSS, and other files hosted on your hosting platform.
Step 1: Creating a Redirect
When you install an SSL certificate, you are given another version of your site: https. This more secure version of your site isn’t used by default; instead, you now have two versions of your site that are accessible. To keep traffic from unwittingly visiting the insecure http version of your site, you need to create a redirect.
As a result of varying hosting interfaces, the process of creating a redirect depends on your hosting provider. Some hosting plans give you a simple method for creating redirects within their interface. Refer to your hosting provider’s documentation for more information. If your hosting provider does not have a convenient redirect option, continue on to the next section. If it does, set one up, then skip to Step 2: Updating Links.
Setting up a Redirect in a .htaccess File
However, the hosting provider does not have a simple way to create a redirect, you may have to access your site’s .htaccess file. The .htaccess file is a hidden file (marked as such by the period in front of its name). Some hosting companies make it available to you, though others leave it hidden. If you cannot find the .htaccess file within your hosting account, you may have to contact your hosting company and ask if they will grant you access.
Once you have access to your .htaccess file, you will need to add the redirect statement to it. This is not hard to do, just add the line:
Redirect 301 / https://www.example.com
Replace www.example.com with your URL and make sure it’s prefixed with https. Add a blank line after the redirect. This will tell the .htaccess file that is has reached the end of the redirect statement. This leads to the last step: saving the .htaccess file to your hosting account. When this is completed, all traffic will automatically be redirected from the http version of your site to the https version.
Step 2: Updating Links
The next steps is to make sure no links in your code use the http prefix. Be sure to change all instances to https. This is commonly a problem when absolute links are used. Absolute links are links that are fully written out. The opposite of an absolute link is the relative link. Relative links are abbreviated and do not include the http or https prefix.
Absolute Link:
http://pair.com/home.html
Relative Link:
/home.html
Consequently, you may want to consider switching your absolute links to relative links, since they will work regardless of how your site is served.
WordPress
WordPress is a popular CMS that gives users the ability to create sites with little to no interaction with code.
Step 1: Setting Up a WordPress Redirect
Setting up a WordPress redirect is different than setting one up for a traditional site. Instead, a WordPress redirect can either be created by installing a plugin, such as Simple 301 Redirect, or by editing the PHP header.
Redirect By Plugin
This method is recommended for those with beginner to moderate WordPress experience.
If you decide to use the plugin method of setting up a redirect, follow these instructions:
- Download the plugin to your WordPress plugin directory
- Activate the plugin through the Plugins menu in WordPress
- Go to the Simple 301 Redirect plugin’s Settings
- Click the 301 Redirects page
- Add redirects to the https version of your site (such as https://www.example.com)
Once the redirects are added, the site will begin to use https instead of http.
Redirect by PHP
We do not recommend this method for WordPress beginners. You should only attempt this if you are an advanced WordPress user.
On the other hand, you can edit the PHP header to create a redirect. Keep in mind that we do not recommend this route unless you have an advanced understanding of WordPress. If you choose this route, see the wp_redirect feature’s developer documentation on WordPress for instructions.
Step 2: Updating WordPress Database Links
The next step is to update all the links in your database to https. Skipping this step may result in your images and other media not being displayed properly. You can use plugins, such as Velvet Blues, to automatically update the database links. If you would rather not use a plugin, you can also use a command line tool, like wp-cli.
When making changes to the database links, be sure that you do not modify any links in the guid column. That being the case, if you use the Velvet Blue plugin, it will automatically leave the guid column alone.
Step 3: Updating WordPress Address URL
In addition to these steps, you should also update the WordPress address URL within the WordPress editor interface. This will change the site’s internal links from http to https. To do this, follow these instructions:
- Log into your WordPress account
- At the bottom of the left sidebar, click Settings
- Click General

- In the boxes next to WordPress Address (URL) and Site Address (URL), add an ‘s’ to ‘http’
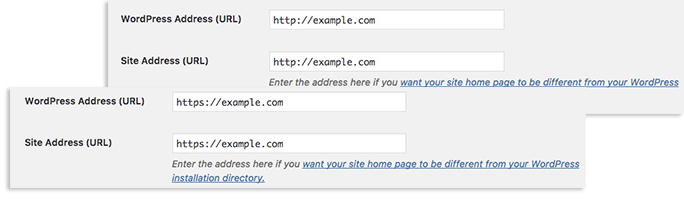
Once the WordPress Address URLs have been updated, your site should now serve completely over secure https.
The Necessity of HTTPS
By learning how to serve your site over https, you have taken a step towards a more protected site. If you have already installed an SSL certificate, changing your site to https completes the SSL installation process. After this, your visitors will be able to confidently visit your site, knowing that their information is safe. If you have not yet installed an SSL certificate or want to know more, you may want to check out our blog, What is an SSL Certificate.